I forgot to mention in the previous post that water in the clay will also make it explode. Same reason--it heats up and wants to escape. Aaaand having an even thickness like I was talking about helps the clay DRY evenly.
I may not be updating on this blog for a few weeks because at about 2:30 this morning I decided I'm going on a little trip! I'll be in Iowa for a few weeks. So actually I may update because part of the reason I'm going to Iowa is to participate in a faculty/alumni ceramics show at Indian Hills Community College in Ottumwa where I went to school.
YEAH!
Sunday, August 30, 2009
Saturday, August 29, 2009
Busted!
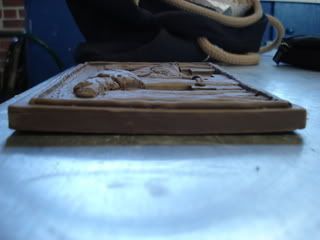
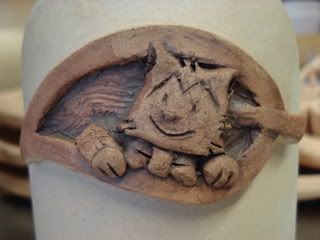
Alright, so I'm not like a top class ceramist or anything. My craftsmanship is sometimes sub-par. (Well, in my opinion. My standards are higher than my abilities.) I don't worry about it all the time. I think I just don't have enough experience yet to have all that neatness business down and I'm more focused on the creative parts of the work. Anyway, I brought that Laugh-Out-Loud Cats tile home with me so I could baby it while it dries. I was looking at it earlier and it occurred to me that parts of it are 3/4" thick. As if I didn't have enough things falling apart around me, I suddenly realized that this piece could blow!
The thickness itself isn't a problem, but when you've got a thick wad of clay, there's more of a risk for air bubbles in the clay. When you fire clay (this one's going up to somewhere around 2000 degrees before it's done), if there's any air inside it, it will expand and it will escape--even if that means blowing up the piece. (This is why in hollow pieces you will always find at least a little pinhole to let the air out.)
If I had just rolled out this clay to 3/4" inches, it probably would have air bubbles, but this was rolled out to 1/2", most of it cut out, and the thicker parts carefully built up, so it should be alright (I'm telling myself). I mean, I pretty much know what I'm doing. But usually, even when I'm careful like this, I do carve out the thick parts from the back:
Tile made from slab rolled out to prolly 1/4", built up.
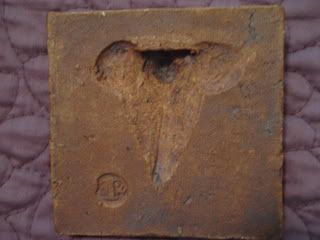
Thick parts carved out. So it's really about the same thickness everywhere, for the most part. This one also is carved in such a way you can hang it from a nail.
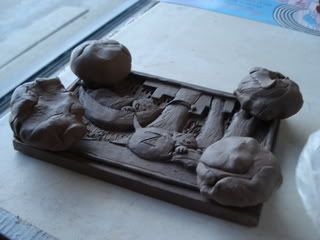
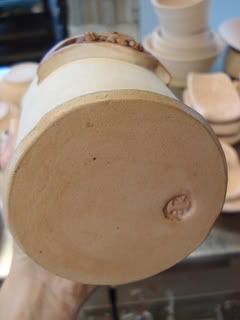
I did not do this with the Laugh-Out-Loud Cats tile because I was so scared to pick it up too much and mess with it. It's the most complicated bit of sculpting I've ever done*. This is the back of the Laugh-Out-Loud Cats tile:
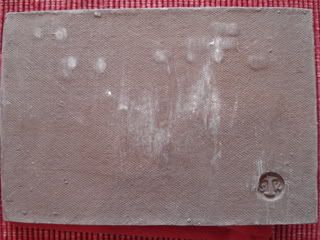
The white stuff is just dust. The bumps are from pressing a tool in to make the impressions of windows in the buildings. The center is kinda rubbed smooth from working it so much on the other side. It's kind of an ugly little thing, ain't it?
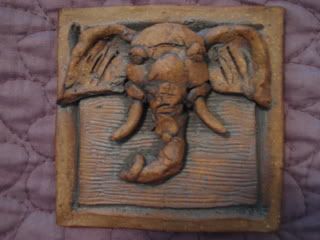
By the way, it will have a finish pretty similar to the elephant tile depicted.
*Besides something like this:
The thickness itself isn't a problem, but when you've got a thick wad of clay, there's more of a risk for air bubbles in the clay. When you fire clay (this one's going up to somewhere around 2000 degrees before it's done), if there's any air inside it, it will expand and it will escape--even if that means blowing up the piece. (This is why in hollow pieces you will always find at least a little pinhole to let the air out.)
If I had just rolled out this clay to 3/4" inches, it probably would have air bubbles, but this was rolled out to 1/2", most of it cut out, and the thicker parts carefully built up, so it should be alright (I'm telling myself). I mean, I pretty much know what I'm doing. But usually, even when I'm careful like this, I do carve out the thick parts from the back:
Tile made from slab rolled out to prolly 1/4", built up.
Thick parts carved out. So it's really about the same thickness everywhere, for the most part. This one also is carved in such a way you can hang it from a nail.
I did not do this with the Laugh-Out-Loud Cats tile because I was so scared to pick it up too much and mess with it. It's the most complicated bit of sculpting I've ever done*. This is the back of the Laugh-Out-Loud Cats tile:
The white stuff is just dust. The bumps are from pressing a tool in to make the impressions of windows in the buildings. The center is kinda rubbed smooth from working it so much on the other side. It's kind of an ugly little thing, ain't it?
By the way, it will have a finish pretty similar to the elephant tile depicted.
*Besides something like this:
Tuesday, August 25, 2009
Drying tiles
Tiles will want to warp when they dry.
I've got a little curl here, you can see. (In this case I think it's partly because it's been on a slightly warped wooden board.) It's not significant. At this point it's unlikely I can reverse it, but I can try to prevent any further curling.
This happens because the top, which is exposed to air, dries faster than the bottom. And clay shrinks as it dries. At Indian Hills, we'd dry our tiles on an open grid rack (which was actually the grid off one of those square box fans). At WaterWorks, we've got plaster boards, which will suck moisture out.
Here I've got the tile on a plaster board with wads of clay weighing the corners down. I know it looks silly, but I've done it many times before and my tiles are mostly flat with at most a tiny wobble.
I'm a little concerned this one's going to end up a little wobblier than my others.
Glazing Pip, etc.
Dipped bottom in denim blue glaze. (There wasn't enough of the green I wanted, so I opted for the blue I knew would work.) Then sponged off the glaze that pooled on the waxed parts (the bottom and on the Pip deco).
Time to dunk the top in white.
There will be a little overlap. The colors in this case will mix to make a light blue.
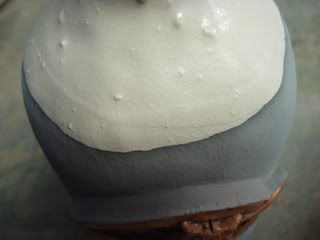
The result in profile:
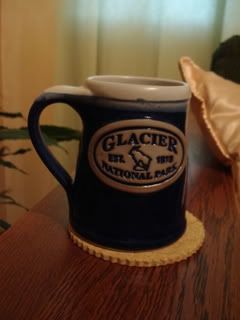
The inspiration for my glazing scheme comes from this wheel-thrown mug by Whitefish Pottery, Whitefish, Montana.
Time to dunk the top in white.
There will be a little overlap. The colors in this case will mix to make a light blue.
The result in profile:
The inspiration for my glazing scheme comes from this wheel-thrown mug by Whitefish Pottery, Whitefish, Montana.
Thursday, August 13, 2009
Laught-Out-Loud Cats #1189

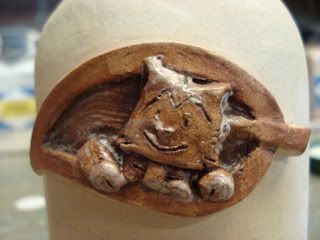
It's done! Pretty much. I starting putting in Apelad's signature, but then realized I couldn't see the end of it on my reference image, so I'll have to add the "RD" later (of A. Koford). And maybe clean up some bits. Pip's face doesn't match the proportions of the original (mine is shorter and wider) but it's CUUUUUTE and that was really the hardest part of the whole thing and I think that's just the way it's going to be!
I am so excited to have done this!
Red iron oxide, glaze

This pot is...kind of hideous. (It's called "Strange Slope".) Red iron oxide (powder mixed in water) is brushed on, then the excess sponged off. There is no glaze on this piece.
I like how it kind of looks like blood in the sink.

Glaze is different than a stain because it has a more complex recipe and a glass-forming agent and so on, while the stain in this case is just one ingredient (iron oxide might be used as a colorant in some glaze recipes).
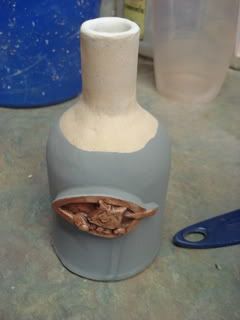
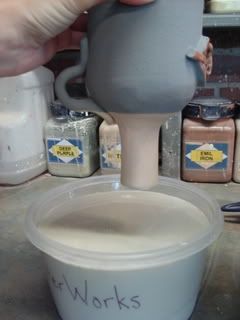
To glaze this piece, I started by pouring glaze inside (with the help of a funnel). You can see I overfilled it and it spilled on the counter. Glaze is easily wiped off with a wet sponge. You can see there's a chunk in the glaze that I might rub off when it dries (it just dries to a powder) or leave it there because it won't hurt anything. Since I had to get the outside wet because of the spill, I didn't want to glaze the outside yet because I want the clay to be fairly dry. Then it can suck up the water in the glaze, causing it to stick.
I ran out of time but I'll finish it tomorrow. The inside is glossy white and the outside will be a forest or olive green. To glaze the outside, I'll dip the piece rather than pour. Actually I'll dip the bottom portion in green, and the top portion in the white, so it will look similar to the bottle I posted previously.
Wednesday, August 12, 2009
It's getting somewhere!
It's almost done! Pip needs work, but most of the rest of it is in place. Just needs cleaning up and stuff. Wheeeeee!
Waxing Pip
Yesterday I applied red iron oxide to the Pip hobo jug. Today I applied wax:

Painting on wax resist with a brush. CAREFULLY! If you make a mistake, the only way to get it off is to bisque it again (to burn it off).
All done!
Also applied wax to the bottom (the "foot") to make it easier to clean glaze off the bottom. I think it comes off easily enough with a wet sponge anyway, but it's standard practice at Waterworks, and it's kind of fun to paint it on, so I do it anyway.
Tuesday, August 11, 2009
Updates...
Step one of glazing the Pip hobo jug: Apply red iron oxide. Iron oxide (rust) powder mixed with water and brushed on.
Then sponge off the excess. This brings out detail and texture.
(The next steps will be brushing on wax resist over the iron oxide to keep glaze off, then actually applying the glaze.)
Bad news regarding this coil piece. I let it dry too fast. Clay shrinks as it dries and the inside dries slower than the outside, so drying pieces like this must be carefully controlled (only letting it sit out to dry one or two hours at a time, using a blow dryer or propane torch to help the inside dry out a little faster). But I got overconfident and left it uncovered when I shouldn't have. This is what happens:
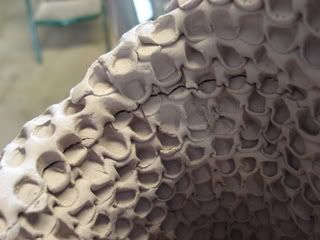
I can't fix it. I've tried fixing others and it hasn't worked very well, and the attempt would be too obvious anyway. I'll just have to let it be. The crack might get even bigger when fired. I'm going to fire it anyway. I just won't be able to show or sell this one.
Laugh-Out-Loud Cats tile:
I cleaned up the edge on the skyline, started working on the cats. Some parts are not attached and will be replaced later. Some is just sketched in and will be redone later.
I find myself unable to work on this project for more than one hour (or less) at a time. But it's getting done slowly and steadily. I'm just really good at wasting time and working on parts I know I'm going to just redo anyway. I don't really know why I'm stalling. But it won't be much longer now. I'll try to have it done by the end of the week.
Then sponge off the excess. This brings out detail and texture.
(The next steps will be brushing on wax resist over the iron oxide to keep glaze off, then actually applying the glaze.)
Bad news regarding this coil piece. I let it dry too fast. Clay shrinks as it dries and the inside dries slower than the outside, so drying pieces like this must be carefully controlled (only letting it sit out to dry one or two hours at a time, using a blow dryer or propane torch to help the inside dry out a little faster). But I got overconfident and left it uncovered when I shouldn't have. This is what happens:
I can't fix it. I've tried fixing others and it hasn't worked very well, and the attempt would be too obvious anyway. I'll just have to let it be. The crack might get even bigger when fired. I'm going to fire it anyway. I just won't be able to show or sell this one.
Laugh-Out-Loud Cats tile:
I cleaned up the edge on the skyline, started working on the cats. Some parts are not attached and will be replaced later. Some is just sketched in and will be redone later.
I find myself unable to work on this project for more than one hour (or less) at a time. But it's getting done slowly and steadily. I'm just really good at wasting time and working on parts I know I'm going to just redo anyway. I don't really know why I'm stalling. But it won't be much longer now. I'll try to have it done by the end of the week.
Saturday, August 8, 2009
Out of the kiln!
I didn't get a chance to actually work today because I went along to Bartlesville to see Price Tower (Frank Lloyd Wright design) and the new exhibit in the Arts Center titled UK/OK: Exploring Traditions in Contemporary Design. It was definitely worthwhile. I'd actually never been to a Frank Lloyd Wright building before.
On the way back I did pick up two pieces fresh out of the kiln! I'm fairly pleased with how well they turned out.
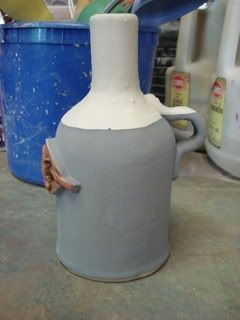
Slab-built jug for Geoffrey:


Coil-built bottle with red iron oxide stain:

On the way back I did pick up two pieces fresh out of the kiln! I'm fairly pleased with how well they turned out.
Slab-built jug for Geoffrey:


Coil-built bottle with red iron oxide stain:

Friday, August 7, 2009
Caves
Rock formations have already been an important inspiration for my work for several years now.
See, building my sculptural work is really like building a playground for my mind. I always see it as if I'm a little person, walking around down there in those spaces (as if I were walking through a canyon or something). For a few pieces I did in college I was actually trying to mimic actual land formations:

(Hope that looks like a canyon to you.)
Others are less obvious, but still those are the sort of spaces I had in mind.
This came out of a trip I took long ago with my family to the Southwest. We saw Arches National Park, the Grand Canyon, and so on. It took several years to incubate and come out in actual work.
Then in college I took a trip with the Geology Club to Mammoth Cave National Park in Kentucky. I'd never been in a cave before. Man, was that a trip! I knew that I'd found new inspiration, but I still don't really know exactly how it's going to come out in my work. For the last piece I did (seen a few posts ago), I DID have in mind cave interiors (deep shafts and things like that).
It's hard to photograph caves because they're so dark and vast and flash only goes so far, but here are a few shapes I think are really amazing. I mean it's just awesome to think about this rock being carved over years and years by water:

Howe Caverns, New York

Floyd Collins' Crystal Cave (inside Mammoth Cave National Park), Kentucky
(This cave is actually closed to the public. It once housed the remains of Floyd Collins, caving legend, and was open for tours. But now it's only opened to special cave people. My group was incredibly fortunate to be allowed in.)

Howe Caverns, New York
A little progress, not much
I've been lazy this week. I've got excuses, but they're too lame to report. Every so often I've gone into the studio to rewet the tile, but not to do much more than that.

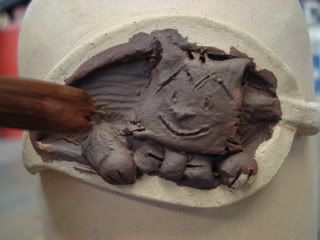
It's wet now, but next time I see it, it'll be relatively dry again. You can see that all I did was start building up the speech bubble and Pip. I was sick that day and gave up quickly. Still don't know if this is going to be a final product or just a practice.
When I first pictured this project, I imagined a much greater level of neatness and perfection, but what I really get is a lot "sketchier." One artist I usually list as a favorite is Pablo Picasso. The reason is not necessarily that I like his art. Several years ago I visited the Picasso museum in Paris, and one of the things I came away with was that Picasso was very prolific, but not necessarily neat. It was a bit of a relief to me because it made me realize that I could be making good art even if it isn't pristine and perfectly neat. (Not that it gives me an excuse to be sloppy.) I just have to remind myself sometimes that I'm usually the only one who notices flaws or errors in my work and I don't need to panic if something doesn't turn out exactly as I imagined it.
Sunday, August 2, 2009
Bean bottle
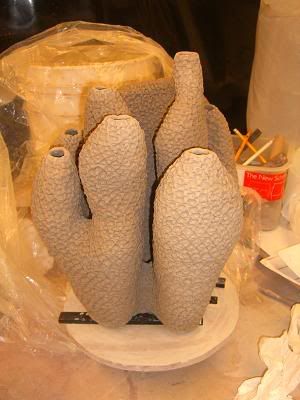
Waterworks isn't open on Sundays, so here's a photo of a recent piece:

I simple coil pot with a bean-shaped base. I'm bad at guessing measurements, but I'd say it's about a foot tall.

I simple coil pot with a bean-shaped base. I'm bad at guessing measurements, but I'd say it's about a foot tall.
Saturday, August 1, 2009
Zzzzzzzzzz...........
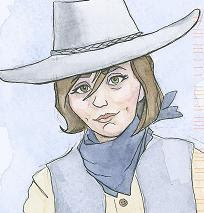
Today I started work on the tile of this image. I'd already prepped the tile itself yesterday. Today it was leather hard. Maybe a little too leather hard, but good enough.
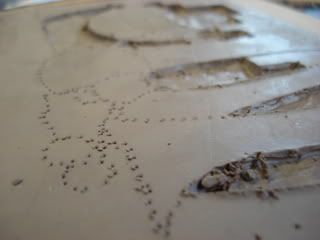
I had a printout of the comic, layed it over the clay, and used my needle tool to transfer outlines to the clay:
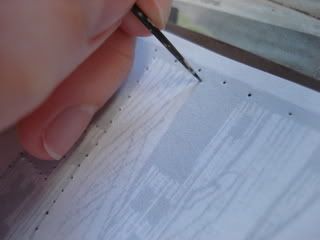
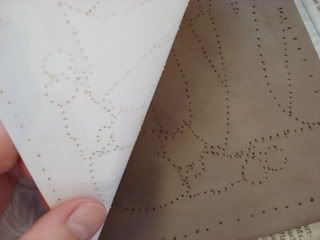
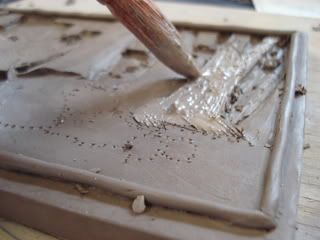
Alright, so, I don't actually have everything totally figured out. I'd planned to carve the background in, as in, the buildings deeper than the sky, and then build the stuff in the foreground up. So the next thing I did was carve out the buildings. Which was unfortunately more of a challenge than I realized it would be, not helped by the fact that the clay was so hard (and unforgiving).
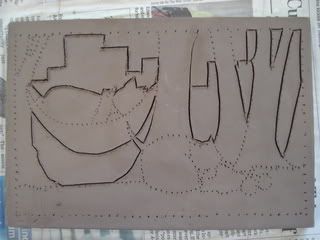
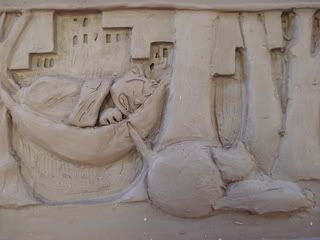
If this is going to work, I'm really going to need it to come out more boxy and less...crappy. I decided to just work on other stuff and try to figure it out later.. So I just started working on the trees. I scored 'em, brushed on slip, and then stuck more clay on and kinda squished it around until it seemed alright.
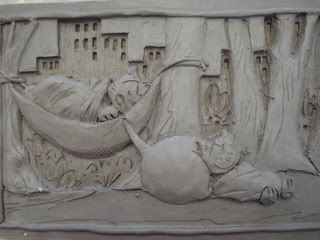
There are actually two layers of trees because two of them are behind one (on the right half), so the three more prominent ones are built up, and the two behind ones are just carved out of what was there. I did a little work on the hammock as well, but the studio was closing. This is as far as I got:
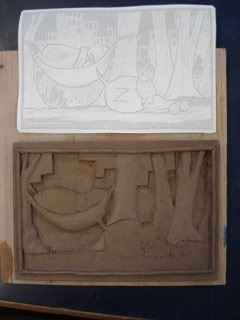
This may end up as a practice piece rather than final product because right now it's kind of, well, ugly as. I've still got plenty of problems to work out, besides just getting it to look neater. Such as, what am I doing with the foreground?? (I would like to know!)
I had a printout of the comic, layed it over the clay, and used my needle tool to transfer outlines to the clay:
Alright, so, I don't actually have everything totally figured out. I'd planned to carve the background in, as in, the buildings deeper than the sky, and then build the stuff in the foreground up. So the next thing I did was carve out the buildings. Which was unfortunately more of a challenge than I realized it would be, not helped by the fact that the clay was so hard (and unforgiving).
If this is going to work, I'm really going to need it to come out more boxy and less...crappy. I decided to just work on other stuff and try to figure it out later.. So I just started working on the trees. I scored 'em, brushed on slip, and then stuck more clay on and kinda squished it around until it seemed alright.
There are actually two layers of trees because two of them are behind one (on the right half), so the three more prominent ones are built up, and the two behind ones are just carved out of what was there. I did a little work on the hammock as well, but the studio was closing. This is as far as I got:
This may end up as a practice piece rather than final product because right now it's kind of, well, ugly as. I've still got plenty of problems to work out, besides just getting it to look neater. Such as, what am I doing with the foreground?? (I would like to know!)
Subscribe to:
Posts (Atom)